Saturday, October 31, 2009

When Life Gives You Lemons: LCD Edition

The only benefit I can see that came from my little upset yesterday is that I am now able to do a little experimenting. I have first decided to test the backlight dimming theory. The ideas is, as stated a few days ago, that if you lengthen the wires from the power inverted to the LCD backlights, the extra resistance will cause the light to be dimmer. 

So using some extra cat5 cable I had, I soldered in an extension just short of 3 feet. My results: Hard to tell. In the process of doing something, I managed to kill one of the backlights. However, the remaining backlight was still producing a decent quantity of light. It's difficult to judge if it was dimmer or by how much, but it definitely seemed close. So that remains a viable option anyway.

There has also been another development. For the iMac, Apple designed a special, standalone inverter which sits right next to the display. It was suggested that if I could figure out how to use that one instead of the built-in one on the new LCD's power supply, I wouldn't have to worry about cable length. It turns out that might just work.

As seen in the picture below. The iMac's special inverter has a 6 wire "power cable" coming out of it. On the new LCD's power supply, where all the rest of the inverter circuitry seems to be located, there's that big black square thingy which has, at the front of it, 6 beefy solder connections to the board. My theory is, if I pulled that piece out and soldered in six wires in its place, I could run that from the power supply to the iMac's special inverter be home free.


The only problem is, I have no idea which way to orient the wires. Even if you make the giant assumption the wires are in the same order, if I hook it up backwards (the red wire at the top when it's suppose to be at the bottom), I'd probably fry the inverter if not the entire power supply. I'll soon have a backup power supply, but only one inverter...

By the way, here's the code printed on the top of the black square thingy. I googled in but didn't find anything. It's unclear whether the 0 is a zero or the letter. I tried both but neither came up with anything.

SPW-095
LSE r15Ch

If only I had won the lottery, I could just buy up a pickup load of LCDs and iMacs and not have to worry too much about the whole screw up thing. if only...

Friday, October 30, 2009

Monitor Replacement Part 3 - Devastating Failure


There it is.... Well, the backlights worked at least, right?

Anyway I set the LCD matrix in the housing (went to lowe's and called local electronics shop and nobody had heard of that double sided tape so I gave up on it) and put the metal surround back on. Used a little electrical tape to secure everything and went for a test run.

I think the worst part about this is I had the monitor face down on my desk when I first turned it on. When I saw the backlights come... never mind. Needless to say, I'm super down about this.


I have no idea what happened here. The screen obviously cracked in a few places, but that's not what's causing the blue. I've seen tons of people drop their laptops, completely shattering the LCD but there are still portions of different colors and usually have small portions that still accurately map. Not just blue. It doesn't seem to be a problem with the connection to my laptop either (Aluminum 13" MacBook) because the monitor's built in menus weren't working either.

The monitor is no longer on sale at Staples.com but I was able to find it for $107 at PCconnection with free shipping so hopefully it will arrive sometime next week.

Thursday, October 29, 2009

Monitor Replacement Part 2

Spent $45 on the way home from school today to get a shiny new Dremel. I find it interesting that the cheapest Dremel you can buy (at Lowe's) is cordless. The cheapest corded versions started at $70. More powerful motors I guess...

Anyway, got back and took those tabs off in no time. (Don't judge, it's been a while since I've used a Dremel)

Now, there are more different tabs that need to be removed. When I put the diffusion screens from the new monitor onto the iMac's backlight assembly and tried to put the black plastic surround back on, I noticed these diffusers have tabs sticking out in places that the iMac's diffusers don't. I considered just using the iMac's diffusers but upon closer inspection, they one of the layers looked much different so I figure it's best to stick with what was made for the LCD matrix. So I just grabbed a pair of nice scissors and cut 'em right off clean and pretty like. And you're like, that's what she said!

Once everything was all happy with the diffusers, I decided to test-fit the LCD matrix. Too bad it was too big. And you're like... sorry, I'm very tired But seriously, the LCD matrix of the new display was a few millimeters bigger than the one that was installed in the iMac. To add insult to injury, the ribbon cables connecting the LCD matrix to its circuit board is a few millimeters shorter than the iMac's. Yuck. I'll save you the hours of thought process and trial and error that went into figuring this out and get right to it (lucky you!):

So you can't see it in this picture naturally so I've taken the liberty to draw on the track that the LCD matrix fits within. Now the bits on the left are what's in the way. There's stuff in the way on the top to but don't worry, we'll talk about that later. The track along the bottom is (I figure) critical for the LCD to rest on and along the right, the plastic is too thin and cutting the entire track would probably end up breaking it. So I used my Dremel to bring the track down to the surface level.


With the left side out of the way, we can tackle the next problem: the ribbon cables being too short. My solution for this was to completely cut the top of the black plastic surround. I was surprised it actually seemed to free up just enough room and at the same time, still managed to stay firmly connected to the assembly all by itself.

Things to note from the photo above:

  1. When I cut the top off, I left the top corner intact. There is a tab/snap combo that is the key to the black plastic surround not needing any glue to stay on.
  2. Taking the top off the black plastic surround left the aluminum from the backlight lamps exposed. I wasn't sure if that was a good thing or not, so I just covered it with a strip of electrical tape. This has the added benefit of covering and smoothing out my shoddy Dremel job of the tabs on the top at the beginning of this post. 
I test fit the panel and everything seemed to work out. I'm going to wait to install it completely until I can get my hands on some of the double sided tape that was originally used on the black plastic surround to keep the LCD Matrix from sliding around.

Monitor Replacement Part 1

Alright, so I lied. I ripped that iMac to shreds last night. Heres how it all went down:

Note: I'm not going to go over how to dismantle the iMac base or the monitor. Apple's own repair guides are very good, and it's all pretty straight forward. 

So after cracking open the iMac's monitor, I realized there is one minor issues: the new LCD won't fit. The casing on the iMac's panel is, of course, especially designed for the case.

After removing the iMac's Panel and placing in the new one, I noticed that the screw holes that hold the iMac's panel to it's housing are in the way the new panel. I thought about using a Dremel to take them out but that would probably destroy the case.

So instead, I transplanted the new panel into the case of the iMac's panel. This is wasn't really hard, it was just very time consuming and one mishap means I need to buy a new $100 monitor which I would not be happy about. Luckily, it will be quite some time before I'm even able to test to see if this part of the mod worked and by then, there will be so many more things that could catastrophically gone wrong, it won't really matter.

Start by breaking the aluminum colored tape wherever it is present on the iMac's display.

Then, carefully unsnap the tabs that go all the way around the iMac's display and remove the metal surround.


Next de-tab and remove the black plastic surround

Remove the plastic that covers the circuit boards on the back, unscrew the screws holding the boards in place and carefully peel them back. (Fun Fact: I'm just going to stop saying "carefully" and "be careful" now because I don't like to nag (yes I do). Just promise me you'll be careful.)


Now the white plastic bit should just lift right off. There are a few sheets of plastic (diffusers and polarizers I believe) in between the two pieces so make sure you don't let any of them get away from you. I also feel it appropriate to note that it was this step when I had on of those "what the ef am I doing?" moments. Reminding me of this talk Mythbuster's Adam Savage gave regarding failure and these moments. It's worth a watch. 

Now here's where the two roads diverge in the woods. If you were happy with the brightness of your iMac's screen, you can probably try to leave the backlights in, saving yourself loads of work. However, if your screen was dim or non functional (like mine), you're going to need to swap the backlights from the iMac with the backlights (above) from your replacement monitor.

The backlights are pretty easy to remove from the iMac. Just push the exposed ends (where the wires are coming out) up and out of the case.


Once you have them both out, set everything aside and begin to dismantle your new monitor. The process is very similar to the iMac's, but screws are in different places and the tabs/snaps are slightly different. Once you've gotten the casing off of the panel, the actual LCD matrix is completely unprotected so I lay it down on some very soft cotton fabric to prevent any scratching. Yes, those are clean underwear, don't judge me! 


Now the backlight assembly on the new monitor is much easier to take apart than the one on the iMac (you can actually easily pull out the piece of Plexiglas. When I tried to do that on the iMac, I broke one of the tabs holding it in). This is a good thing because you'll need to take the whole thing (Plexiglass and lamps) out of the plastic case in order to get the lamps out.

Take off the last plastic surround by de-tabing it from the back and cutting the tape on the front.


As illustrated below, the backlight lamp is itself different on the new display than the iMac. Because it's so much longer on the back side, it won't fit into the iMac assembly and needs to be trimmed.

Because the lamp's shell is made of aluminum, it's pretty hard to just cut it. There are probably about a million better ways to do this, but I had limited supplies and it was getting late so I used a utility knife to score the cutline (making several passes to get a good dent in the aluminum) and a pair of pliers to twist it off. Make sure you cut enough off the back. If you leave too much, it won't slide all the way into it's new housing.

Once the new Backlights are ready, slide them into the iMac's backlight assembly from the side. I found this to be pretty difficult. Like I said before it would be easier if you could remove the Plexiglass, but when I tried, I broke one of the tabs.

When I got to this point, I was very excited to reassemble the whole thing. But not so fast. Turns out the ribbon cables that connect the circuit boards to the LCD matrix are located in different areas on the new display than they are on the iMac's display. Because of this, almost all of the tabs along the top of the white container are in the way and need to be removed.

After working on this for a while with my utility knife, I was getting nowhere. It was late, I was exhausted, and so I stopped for the night. I'm going to go buy a Dremel tool this afternoon which will make quick work of it and I will probably appreciate having as the project progresses.

Wednesday, October 28, 2009

It Has Arrived!


Work begins in the morning.
...Well, after school.


Quick question, there is a little dirt on here, especially around the ports on the back. Does anybody know of any good way's of giving the white case a really good cleaning? There are also a few hairline scratches on the plastic surrounding the display. Any ideas on how to fill those?

Tuesday, October 27, 2009

Monitor Install Prep

John has brought up a fantastic and very troubling point in the comments of"Monitor Buying". While I knew the LCD power supply wouldn't fit right behind the Panel in the iMac, I was banking on being able to extend the wires to reach from the base of the iMac to the display. However, John adds that in the process of doing this, there will be a loss of current due to increased resistance over the longer cable. 


This made me sad. So, to double check, I emailed an Electrical Engineering teacher who also serves as faculty administrator of the Robotics Club. I figure if anybody should know it would be him. Here is his answer: "If you are just lengthening the power lines, you will not have any problems. There should be any 'dimming' issues." 


As you can tell, he seemed quite sure of himself. Now I'm not sure at all. A little research reveals that there is indeed a drop in current over longer lengths of wire. I'm guessing the wire on the Panel is 28 AWG, which is listed as having a resistance of about 65 milliohms per foot. However, I have no idea how much current the panel itself is pulling. I tried hooking everything back up (the panel must be plugged back in and have a source or the monitor will idol) and getting a reading with my multimeter but when I did there was something of a sparking sound and the backlight flickered on and off. I stopped at this point. It seems to still be working alright but I'd rather not take any more chances. 

At this point, I'm not exactly sure what to do. I guess I'll just extend the wires and hope for the best. Right now, I'm hoping that the ribbon cable that go from the monitor to the video card in the iMac is the same (or very similar) to the on on the LCD Panel so I won't have to worry about trying to thread a video extension cable through the neck. We'll see...

Sunday, October 25, 2009

iMac Shipment

My iMac is on a UPS truck somewhere in between its previous home in Farmingdale NY and Eugene OR. It is scheduled to arrive sometime October 28. That is a wednesday. I have a midterm that day. I have a huge project due the next day. I am not happy about this.

Saturday, October 24, 2009

Mixed Bag

After hyping myself up over it all, I was pretty disappointed at the selection of books at the Powell's Technical bookstore. If I would have had more time I would have liked to check out their main location but the clock just didn't permit.


I did however pick up this massive book called "Upgrading and Repairing PCs 17th edition"for $25. It's huge. The book has 1582 pages filled with every possible detail about everything from processor sockets to Power Supply cable pinouts. I'm not sure how much good I'm actually going to get out of it, but I'm sure I'll end up cracking it open a couple times.

What I was really looking for was something that would detail with actual computer modification. Things like soldering your own USB connectors, extending ribbon cables, making VGA cables, and solving power requirement differences between laptop CD drives and full sized 5.25" CD drives. Does anybody have any recommendations?

Friday, October 23, 2009

Lesson #1


This is how tomorrow was supposed to go for me: Drive to portland, spend some quality time with the family, drop by Powell's Books to grab a couple computer modding books if I can find any, and, oh yeah, buy my iMac. Bottom line is, it's almost 5:00pm and as of now, there are no 17" iMac G4s currently up for sale on CraigsList. So tomorrow, I will still be heading up to Portland to hang with the fam, and I will still go to Powell's and look for some books. But I will not be buying my iMac.

And you're sitting there thinking I don't really care about this guy's personal problems, what's the point?

My point is, I had planned for about a week now to buy my iMac in Portland. When I discovered that Portland's supply of iMacs was fresh out, I panicked. I ravaged through eBay's collection of iMacs and, within 5 minutes, bought one. Now I'd say that all-in-all, I got a pretty good deal: 17" in good condition with a broken screen for $160 shipped. However, I didn't bother asking the seller to email me some high resolution pictures of it so I could really verify the unit's condition. This was not a super smart move. However, I have this LCD monitor laying in pieces on my desk and I just couldn't stand the idea of waiting any longer.

Now, after even more blabbling, what should you take away from this? Either have lots of patience or procure your iMac before the rest of your stuff ships and you start ripping it apart.

I'm not entirely sure when my iMac is going to get here. Hopefully next week sometime. That's another thing about eBay: so much waiting....

Neck Surgery: Tools


When I went to go pick up the driver to open the iMac's neck, Jim (not his real name) was just finishing up the first one of these. The process was quite: He used a milling machine to drill the 3 holes and inserted the 3 pins into the holes. I believe he said the pins were 2mm in diameter which is just slightly too big to fit in the holes so he filed them down. The "bit" itself is fits into a 1/2 inch socket.

Important note: You need 2 of these. There are a total of 4 of these special screws in the neck (2 at the top and 2 at the bottom). The two at the top and the 2 at the bottom screw into each other so if you only have one bit, the other side will just spin and you will get nowhere.

Thursday, October 22, 2009

Neck Surgery: Solutions


One of the major challenges with replacing the screen in the iMac with a non-Apple panel was having to open up the neck to run new cables. The screw head used is quite beautiful but isn't used on anything else in the world (as far as I know). The choice is understandable though: there is a giant spring under lots of pressure in there that could cause injury to anybody who opens them carelessly. Anyway... Finding the drivers to take these apart is very difficult. The only place I could think to look would be a well established Apple Authorized Reseller with a good repair service (not an actual Apple store. I'm sure they stopped stocking the drivers for these years ago). 

However, I was lucky enough to track down a workshop here at the University of Oregon (that shall remain anonymous) that would make it for me. The guy there was super nice and even though they aren't supposed to be doing these things for non-chemistry activities, the project was simple enough he agreed to have it ready for me tomorrow if I promised not send anybody else his way for anything. So if you're in Eugene and find yourself needing one of these, ask to barrow mine, please don't bother the nice workshop people!

Wednesday, October 21, 2009

LCD Monitor Disassembly

Warning! This will void your warranty. Also, I am not a professional or a teacher and I don't really know what I'm doing. So please, don't blame me if you break something. 

Well the monitor has arrived, and so I have wasted no time in tearing it apart. Here's how it all went down:

Supplies: Needle-nose pliers, Flathead screwdriver, Phillips screwdriver

I didn't do this first, but you should: use the pliers to unscrew and remove the two thingys on the VGA port. You'll thank me later.


After removing the 4 outside screws, pull off the stand attachment and remove the 5th screw in the middle. 

There are little tabs along the bottom that keep the two halves of the case snapped together. Use the flathead screwdriver to gently pry each of them apart. Once the bottom is separated, continue to pry the two halves of the case apart. 

Remove the front of the case stand the monitor upright on the desk. Carefully move the LCD panel away from the back of the case so you can see how everything is connected. It would be a great tragedy to rip out one of these cables so be cool and don't be hasty. Remove the aluminum shiny tape and then gently pull the white ribbon cable down to disconnect it from the LCD Panel. While continuing to be super careful, swing the Panel all the way "open" and lay it and the back of the case on the table.

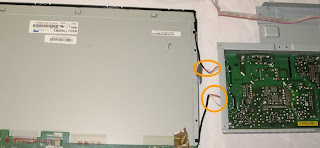
At this point, the metal housing the circuitry are contained within should easily separate from the plastic cover.

Now pull out your pliers and carefully remove the 2 pairs of power leads from the power supply. After a little trial and error I found the best way to gently pry them free was to put pull from the empty center channel of the connector. 


Before you get too much farther, I would recommend marking which set came from which port on the power supply. Because they're identical, I doubt it actually matters, but the last thing you want is to be having to worry about switching the connectors if your monitor isn't working. 

Finally, just as a good practice, I marked the side of each connector that has a red cable so when it comes time to put them back together, they don't end up backwards. I'm pretty sure they only actually go in one way, but I still think it's better to have that extra visual conformation. 

And that's pretty much it. The monitor is now in pieces and ready for installation. Of course, I have absolutely nothing to put it in. I really need to head up to Portland and pick up an that iMac...

Tuesday, October 20, 2009

Oct. 2009 iMacs, MacMinis


So today, Apple unveiled their latest iMac offerings which include bigger, more beautiful displays and wonderful design refresh. During their wonderful design video, Jonathan Ive (who designed the iMac G4) speaks to how the new design makes "everything about the display, therefore everything is about your content."And this is true. This new iMac is the first iMac that's truly dissolved away the computer behind the screen.


But is that what you really want? I guess it really depends on what kind of person you are. I feel like because the new iMac lacks all unessential elements and everything has become so necessary, that it's now devoid of personality. It's been heading in that direction ever since the G5 was released and I really think it's there. And while that's fantastic for corporations and... other people, I still want my computer to have personality. Don't get me wrong, the new iMac is incredibly beautiful and elegant. But I still want my iMac G4.

Ohhhhhhhhhhhhhh and the new MacMinis came out. I'm very excited they're now allowing for 4GB RAM, have faster processors, and have that fantastic NVIDIA GeForce 9400m graphics card that is currently powering my Aluminum MacBook.

....omg, when did they change the design of the apple remote? It's kinda ugly now...

Monitor buying

So yes, I've decided to go with the 17" iMac. So now it's time to buy the monitor. Before I do however, there are a lot of things I need to consider.


  1. Power supply - The first thing I would look for (maybe after price) is if it has an external power supply.  This is important because external power supplies are going to be more compact than one's built into the monitor, They'll be enclosed so you don't have to worry about protecting it, and there's already a long cord that goes from the supply to the monitor. 
  2. Screen quality - Although most cheap displays have very similar panel specs, it's still a good idea to compare the static (or normal) contrast, brightness, and color gamut if you can. Lot's of sites don't bother to include this information, but you can usually find it with a little bit of searching. 
  3. Built in video cable - Although fewer monitors utilize these, if you can find a monitor with a VGA cable soldered directly to the board, that's one less bulky VGA connection that has to take up room inside the dome. 
  4. Simple is good - Lots of monitors these days (especially the 20 inchers) are packed with stuff you aren't going to need for this project like built-in USB hubs, speakers, and multiple video inputs. If you can avoid these things, it might make your life a little easier. Although these things shouldn't affect the panel at all, they mean extra circuitry inside the case which may or may not be modular. 

When shopping online, things like power supply and built in video cable can be hard to determine. I spent hours looking around the internet for stores that include pictures of the back of the monitor because nobody explicitly says what kind of power supply it uses.


In the end, I found a great deal on a Hanns HW173 17" widescreen monitor. It does not have an external power supply or built in video cable but it was $99 from staples.com with free shipping and when you look at the back you can see that the circuitry isn't spread out all over the place.

Now All I need is a 17" iMac to put this thing in...

Monday, October 19, 2009

Jumping Off

Before I can go any further, I have to choose which of the 3 iMac models I want.


There is the 15" square screen, the 17" widescreen, and 20" widescreen. Here are my deciding criteria:

  1. Looks - Forgive me for being shallow, but I'm doing this because I want a super beautiful computer. For my money, the 15" square screen isn't that appealing and the 20" screen is too big in proportion to the dome. The 17" wins out here
  2. Price and availability - As of October 2009, 15" models run about $100-$200 and are everywhere. 17" models run about $200-$350 and are pretty easy to find. 20" models run anywhere from $300-$600 and are few and far between.
    • Where to buy - If you live within 3 hours of a major city, I strongly recommend Craigslist. The prices are easily $50-$100 cheaper than ebay and you don't have to worry about the $50+ shipping fee if you can pick it up yourself. 
Now that you know which model you're going to get, you'll need to find an appropriate LCD display. As with the computers themselves, the bigger the screen, the more expensive they'll be (in general). However, 20" LCD monitors are really becoming the standard so they've come down in price a lot over the last few years. This also means many fewer companies are making 17" widescreen monitors and they're becoming harder to find.

Sunday, October 18, 2009

Game Plan

Here's how I'm going to approach this project:
  1. Install the monitor inside the iMac shell. 
  2. Prepare the iMac: modify I/O ports, DVD drive, internal wiring so it's ready to be plugged in. 
  3. Get the sphere speakers working with a normal audio source. 
  4. Buy the MacMini - Because it's going to be more than half the cost of the entire project, I want to put it off as long as possible. Also I'm really hoping for a spec boost sometime in the next few months. 
  5. Stress test the Mini - I want to see how hot I can get it while it's still in its original enclosure so I know what to expect when it's all in pieces. 
  6. Install the Mini - If I do steps 1, 2, and 3 correctly, this should just be a matter of plug everything in. I know it's not actually going to be that simple, but one should have dreams.
That is the game plan. 

Saturday, October 17, 2009

Upcoming Challenges

There is obviously a reason why nobody has been able to pull this off before: the laundry list of obstacles to overcome is immense. Here is an incomplete list of problems I must overcome in the process of doing this transformation:
  • Replace the Apple LCD panel with an off the shelf Computer Monitor - The panel in the iMac uses a proprietary connector type which is not directly compatible with standard VGA or DVI connection formats. It requires both the iMac's integrated graphics card and built in power supply, neither of which are compatible with the MacMini.  
  • All those I/O Ports - Of course all the USB, Firewire, audio and networking ports are soldered directly to, and held in place by, the iMac's motherboard. 
  • Power - I have one power cord going into the iMac's shell and at least 2 devices that will need direct AC Power (the mac mini and LCD power supplies)
  • Space - It's going to be a tight one. Even though the MacMini is only a 6.5" square that's 2" tall and the iMac is ~10" dome, the two weren't designed to fit together. There's also the power supplies and probably more I'm going to have to find room for. It's going to be tricky.
  • Power button - I guess it has the same problem as the I/O ports. Probably should have included it up there. Ooopse...
  • DVD Drive - To keep things authentic, I'm going to be ditching the super slim slot loading drive that comes with the MacMini it favor of the full sized tray loading 5.25" drive which will eject out of the front like it's supposed to. However, not only is this devise much bigger, it requires more power than the smaller, notebook sized drive from the Mini. 
  • Sleep light - I would really like to get the pulsating sleep light from the MacMini to power the existing one on the display of the iMac
  • Speakers - The sphere speakers that came with the iMac plug into a special powered speaker port on the iMac. Like the monitor, all the circuitry required for these is integrated into the motherboard so you can't just plug it into the Mini. There is an adapter called the Griffin iFire but they haven't been made in years, only pop up on ebay every few months or so, and end up fetching $300+. I'm not into that and hopefully I can get the specs for the speakers and make my own amp. 
  • Heating - Both the Mini and the iMac were carefully designed to move air through them in specific ways once the Mini is opened up and the parts are all over a larger area, its fans might not be enough to cool every component. 
I will be adding to this list as more problems become apparent.

Friday, October 16, 2009

Introduction


This is it. I'm going to do it. Others have tried, but as far as I have been able to find, none have succeeded. There has been a thread going on for more than 3 years at MacRumers.com of people who were interested in this, but nobody's figured it out. I plan on figuring it out.

The obvious question is "why?". The answer is simple: the iMac G4 is the most beautiful personal computer I have ever seen. Ever since its release in 2002, I have wanted one. In 2004, Apple moved on to the new, slimmer look of the G5. However, to this day, not even Apple has come out with a computer that is a worthy successor. This is why I am determined to have the best of both worlds. I want the beauty and elegance of this 7 year old computer but also the functionality of a new machine.

When I'm done, I want the transition to be seamless. My goal is to have it look and work as if it just came from apple: functioning I/O ports, single power cable, original sphere speakers, DVD drive... As close to original functionality as I can get.

This project is extremely ambitious. I am a college junior graphic design major with a love of mods but very little actual experience. I am by no means wealthy and am looking to do this with the smallest possible budget. That being said, I have no illusions; this project isn't going to be cheap.

I am going to be documenting my entire process here including pictures, commentary, lists, and I'm sure a few dumb jokes.

Wish me luck...