 Warning! This will void your warranty. Also, I am not a professional or a teacher and I don't really know what I'm doing. So please, don't blame me if you break something.
Well the monitor has arrived, and so I have wasted no time in tearing it apart. Here's how it all went down:
Supplies: Needle-nose pliers, Flathead screwdriver, Phillips screwdriver
 I didn't do this first, but you should: use the pliers to unscrew and remove the two thingys on the VGA port. You'll thank me later.
 After removing the 4 outside screws, pull off the stand attachment and remove the 5th screw in the middle.
 There are little tabs along the bottom that keep the two halves of the case snapped together. Use the flathead screwdriver to gently pry each of them apart. Once the bottom is separated, continue to pry the two halves of the case apart.
 Remove the front of the case stand the monitor upright on the desk. Carefully move the LCD panel away from the back of the case so you can see how everything is connected. It would be a great tragedy to rip out one of these cables so be cool and don't be hasty. Remove the aluminum shiny tape and then gently pull the white ribbon cable down to disconnect it from the LCD Panel. While continuing to be super careful, swing the Panel all the way "open" and lay it and the back of the case on the table.
 At this point, the metal housing the circuitry are contained within should easily separate from the plastic cover.

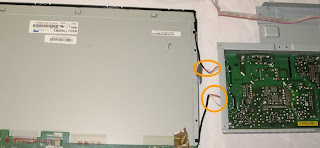
Now pull out your pliers and carefully remove the 2 pairs of power leads from the power supply. After a little trial and error I found the best way to gently pry them free was to put pull from the empty center channel of the connector.
 Before you get too much farther, I would recommend marking which set came from which port on the power supply. Because they're identical, I doubt it actually matters, but the last thing you want is to be having to worry about switching the connectors if your monitor isn't working.
Finally, just as a good practice, I marked the side of each connector that has a red cable so when it comes time to put them back together, they don't end up backwards. I'm pretty sure they only actually go in one way, but I still think it's better to have that extra visual conformation.
And that's pretty much it. The monitor is now in pieces and ready for installation. Of course, I have absolutely nothing to put it in. I really need to head up to Portland and pick up an that iMac...
No comments:
Post a Comment